I'm making a short animation (up to 5 seconds) using Procreate. This project is about learning how
animation works by trying out different styles, like Disney animation and Japanese anime.
I'll be using traditional animation techniques such as rotoscoping and onion skinning. My animation
will
be based on a small number of keyframes that I will bring to life to tell a short, simple story.
The goal is to better understand how animation works and to try creating movement and emotion using
just
a few drawings.
Learning Goals
This project is helping me build skills in both creative and professional areas:
Technical Skills
Learning traditional animation techniques in Procreate, like onion skinning and rotoscoping
Exploring different animation styles, such as Disney and anime
Gaining basic understanding of how animation can be used in interactive media (e.g., websites or
simple games)
Professional Growth
Practicing structured research by studying animation techniques and styles
Collecting feedback regularly to improve my animation
Making changes through design and animation iterations based on testing and reflection
Next Steps
To move forward with this project, I need to:
Secure a project coach
Create and hand in a project plan
Create initial sketches in Procreate
Research animation techniques
Plan user testing approach
Project Plan
The first step in this project was to create a project plan. We needed to ask a teacher to be our
coach
throughout the process. I asked my teacher and assessor, Dirk Norg, to be my coach for this project.
In hindsight, I should have looked for a coach earlier so I could've started the project sooner and
handed in the project plan on time, rather than late in the evening. I had a lot on my mind that
caused
the delay, but planning is definitely something I'm still working on and improving as I go.
In the project plan, we needed to add a few things:
Versioning
Contact & team
Research questions
Deliverables
Deliverables - soundscapes
Planning
Risks
Research
Project Plan Details
I’ve created a simple versioning table with the version number, update description, and date. In the
Contact
& Team section, I included my own info and my coach’s contact details, along with when and how to
reach
us.
For the Research Questions, I explained what my project is about, why I’m doing it, what I want to
achieve,
and what kind of research I need. Under Deliverables, I outlined what I aim to deliver by the end of
the
project, plus any optional additions.
The Scope dives deeper into this using the MoSCoW method — listing what must, should, could, and
won’t be
included. My Planning section is still pretty basic since I just needed something solid to begin
with.
I’ll
be updating it as the project progresses.
In the Risks section, I described things that could affect my progress, like focus issues, illness,
or
personal circumstances. I also included how I’ll deal with those, like using a physical planner,
prioritizing school hours, and seeking help when needed.
Lastly, I listed the research topics I want to explore and the methods I plan to use.
Planning should be more visual rather than just text
Need to clearly decide on animation type (loop vs. story)
Maximum duration recommendation: 5 seconds
Based on this feedback, I made several improvements to my project plan:
Added traditional animation and Disney's 12 principles as specific starting points
Created a table for my planning to be more visual
Defined my project a bit further (duration, style, complexity)
Updated my planning to be more detailed
Incorporated regular feedback moments in timeline
I have also added some notes on research so far, which I will explain further in the sections
below.
For my next step, I'll start creating storyboards that can serve as keyframes, getting feedback
early in the process.
For this project, I’ve researched a few different topics and written about them. To keep the page from
getting too long, I’ve placed everything in tabs, just click on them to explore each topic!
Disney Animation Research
To start my research into animation, I looked into Disney animation techniques. My coach
suggested
this as a starting point — and honestly, it's a great one.
One of the first sources I found was this site:
https://www.thedisneyclassics.com/blog/animation-styles.
It talks about all the different animation styles Disney has used over the years, starting with
Flowers and Trees
(a hand-drawn animation from 1932 using Technicolor) all the way to full-on CGI movies like
Tangled.
Now, while animation style isn't directly relevant to my project — since I haven't really
developed
my own style yet — it was still super interesting to see how Disney evolved. What was most
useful
for me were the mentions of specific animation techniques like cel animation and rotoscoping,
especially in their older hand-drawn work. Those are two methods I definitely want to dive
deeper
into, since they match my own approach for this project.
The article also mentions Pixar's CAPS system (Computer Animation Production System) and modern
CGI
techniques. While that's cool, my focus is on hand-drawn animation, so I won't be exploring CGI
in-depth.
That said… two of my favorite Disney movies are The Princess and the Frog (hand-drawn) and
Tangled
(CGI), so I might still take some small inspiration from how movement and emotion are shown in
those
films — especially things like the fluidity of Tiana's expressions or the way Rapunzel's hair
moves.
Another quick Google search brought me to something super useful: the 12 Principles of
Animation.
These are the core rules Disney animators use to create more lifelike and dynamic animation.
Things
like timing, squash & stretch, anticipation, and follow-through. I think these principles will
help
a lot when I start animating my own scenes, especially since I'm focusing on expressive movement
in
a short timeframe.
So in short:
I'll mainly be researching cel animation and rotoscoping,
Looking into the 12 Principles of Animation,
And taking a bit of inspiration from older Disney techniques rather than newer CGI stuff.
ProCreate
Research ProCreate:
To create my short animations, I'm using Procreate. It's actually pretty straightforward to
make
simple
animations in Procreate.
Procreate also has a separate app specifically for animation and After Effects-style work,
called
Procreate Dreams. It costs around €23 extra, but it doesn't have great reviews, so it's just
not
worth it. I also asked someone with a lot of Procreate experience, and they confirmed it:
Procreate Dreams
isn't worth it.
You can make perfectly good animations in the regular Procreate app, especially since I'm
making low
fidelity animations and focusing more on technique than on super polished visuals. So,
there's
really no
need for the extra app.
Also, the reviews for Procreate Dreams mostly say the same thing:
The app itself isn't bad, but it's missing features that the regular Procreate already
has.
For example, you can't edit brushes in Dreams, which is something you can do in the
normal
version.
The developers did respond to this and said they're working on it, but still.
Some reviews also mention crashing and lack of updates. People paid €22,99 and nothing
has
really improved.
In short: the app has a lot of potential, but paying more for something that's worse than the
cheaper
version? No thanks. I'll just stick with regular Procreate for now.
A teacher also pointed out the term onion skinning for animation. Using Animation Guidance in
Procreate,
you can activate onion skins to see the frames before and after your current one, which helps a lot
when
doing frame-by-frame animation.
As a little kid, I had a Nintendo DS. A Nintendo DSi XL in Bordeaux Red, to be precise. I
mainly played Mario Kart DS (the best Mario Kart in my opinion), but the DS also came with
an application
called Flipnote Studio.
With this, you could create your own animations and if you were able to connect to the
internet (which I couldn't, because internet on the DS was shit) you could also access
animations made by
other people and shared online. As far as I remember, you could even add music somehow, but
I don't think I
ever figured that part out.
I did manage to go online once (a very rare event), and I downloaded a video someone else
had made. It was this little animation of a few frogs in a row singing the Gummy Bear song.
Now don't ask me
why, but I watched that video on repeat. For a very long time. Somehow, that animation
really stuck
with me, I suppose.
Now I'll be honest, when I was little, my drawings were bad. They sometimes still are. But
back then, they were worse. That didn't stop me from having fun in the app, though. Since
there were only a
few basic functions: a couple of brushes, the colors black, white, red, and blue, and an
eraser, there
weren't many options. I remember my brother making a little animation of a police car chase
scene, where
the police car ended up crashing. I, however, mostly drew names where the animation looked
like someone was
writing them out letter by letter.
Since I was little, and since it was on the DS, these animations were never very smooth. But they
did use
the basics of animation, mainly onion skinning. I obviously didn't know that term at the time, but
little me
understood the basic idea: draw a frame, add a new frame, and then draw over the last one with small
changes. Repeat that enough times and you've got an animation.
This is a fun memory from my childhood that's come back to me while starting this project and doing
research.
First Tests with ProCreate
When I first started using ProCreate, I created this short animation to test out the basics of Animation
Assist.
I also did another short animation just for fun and to practice using onion skinning, I made little
circles expanding outward, kind of like ripples in water. It’s a small element I’ll probably include in
one of my keyframes.
After discovering rotoscoping while researching Disney animation styles, I recorded a video of my hand
forming a fist and used it to practice rotoscoping.
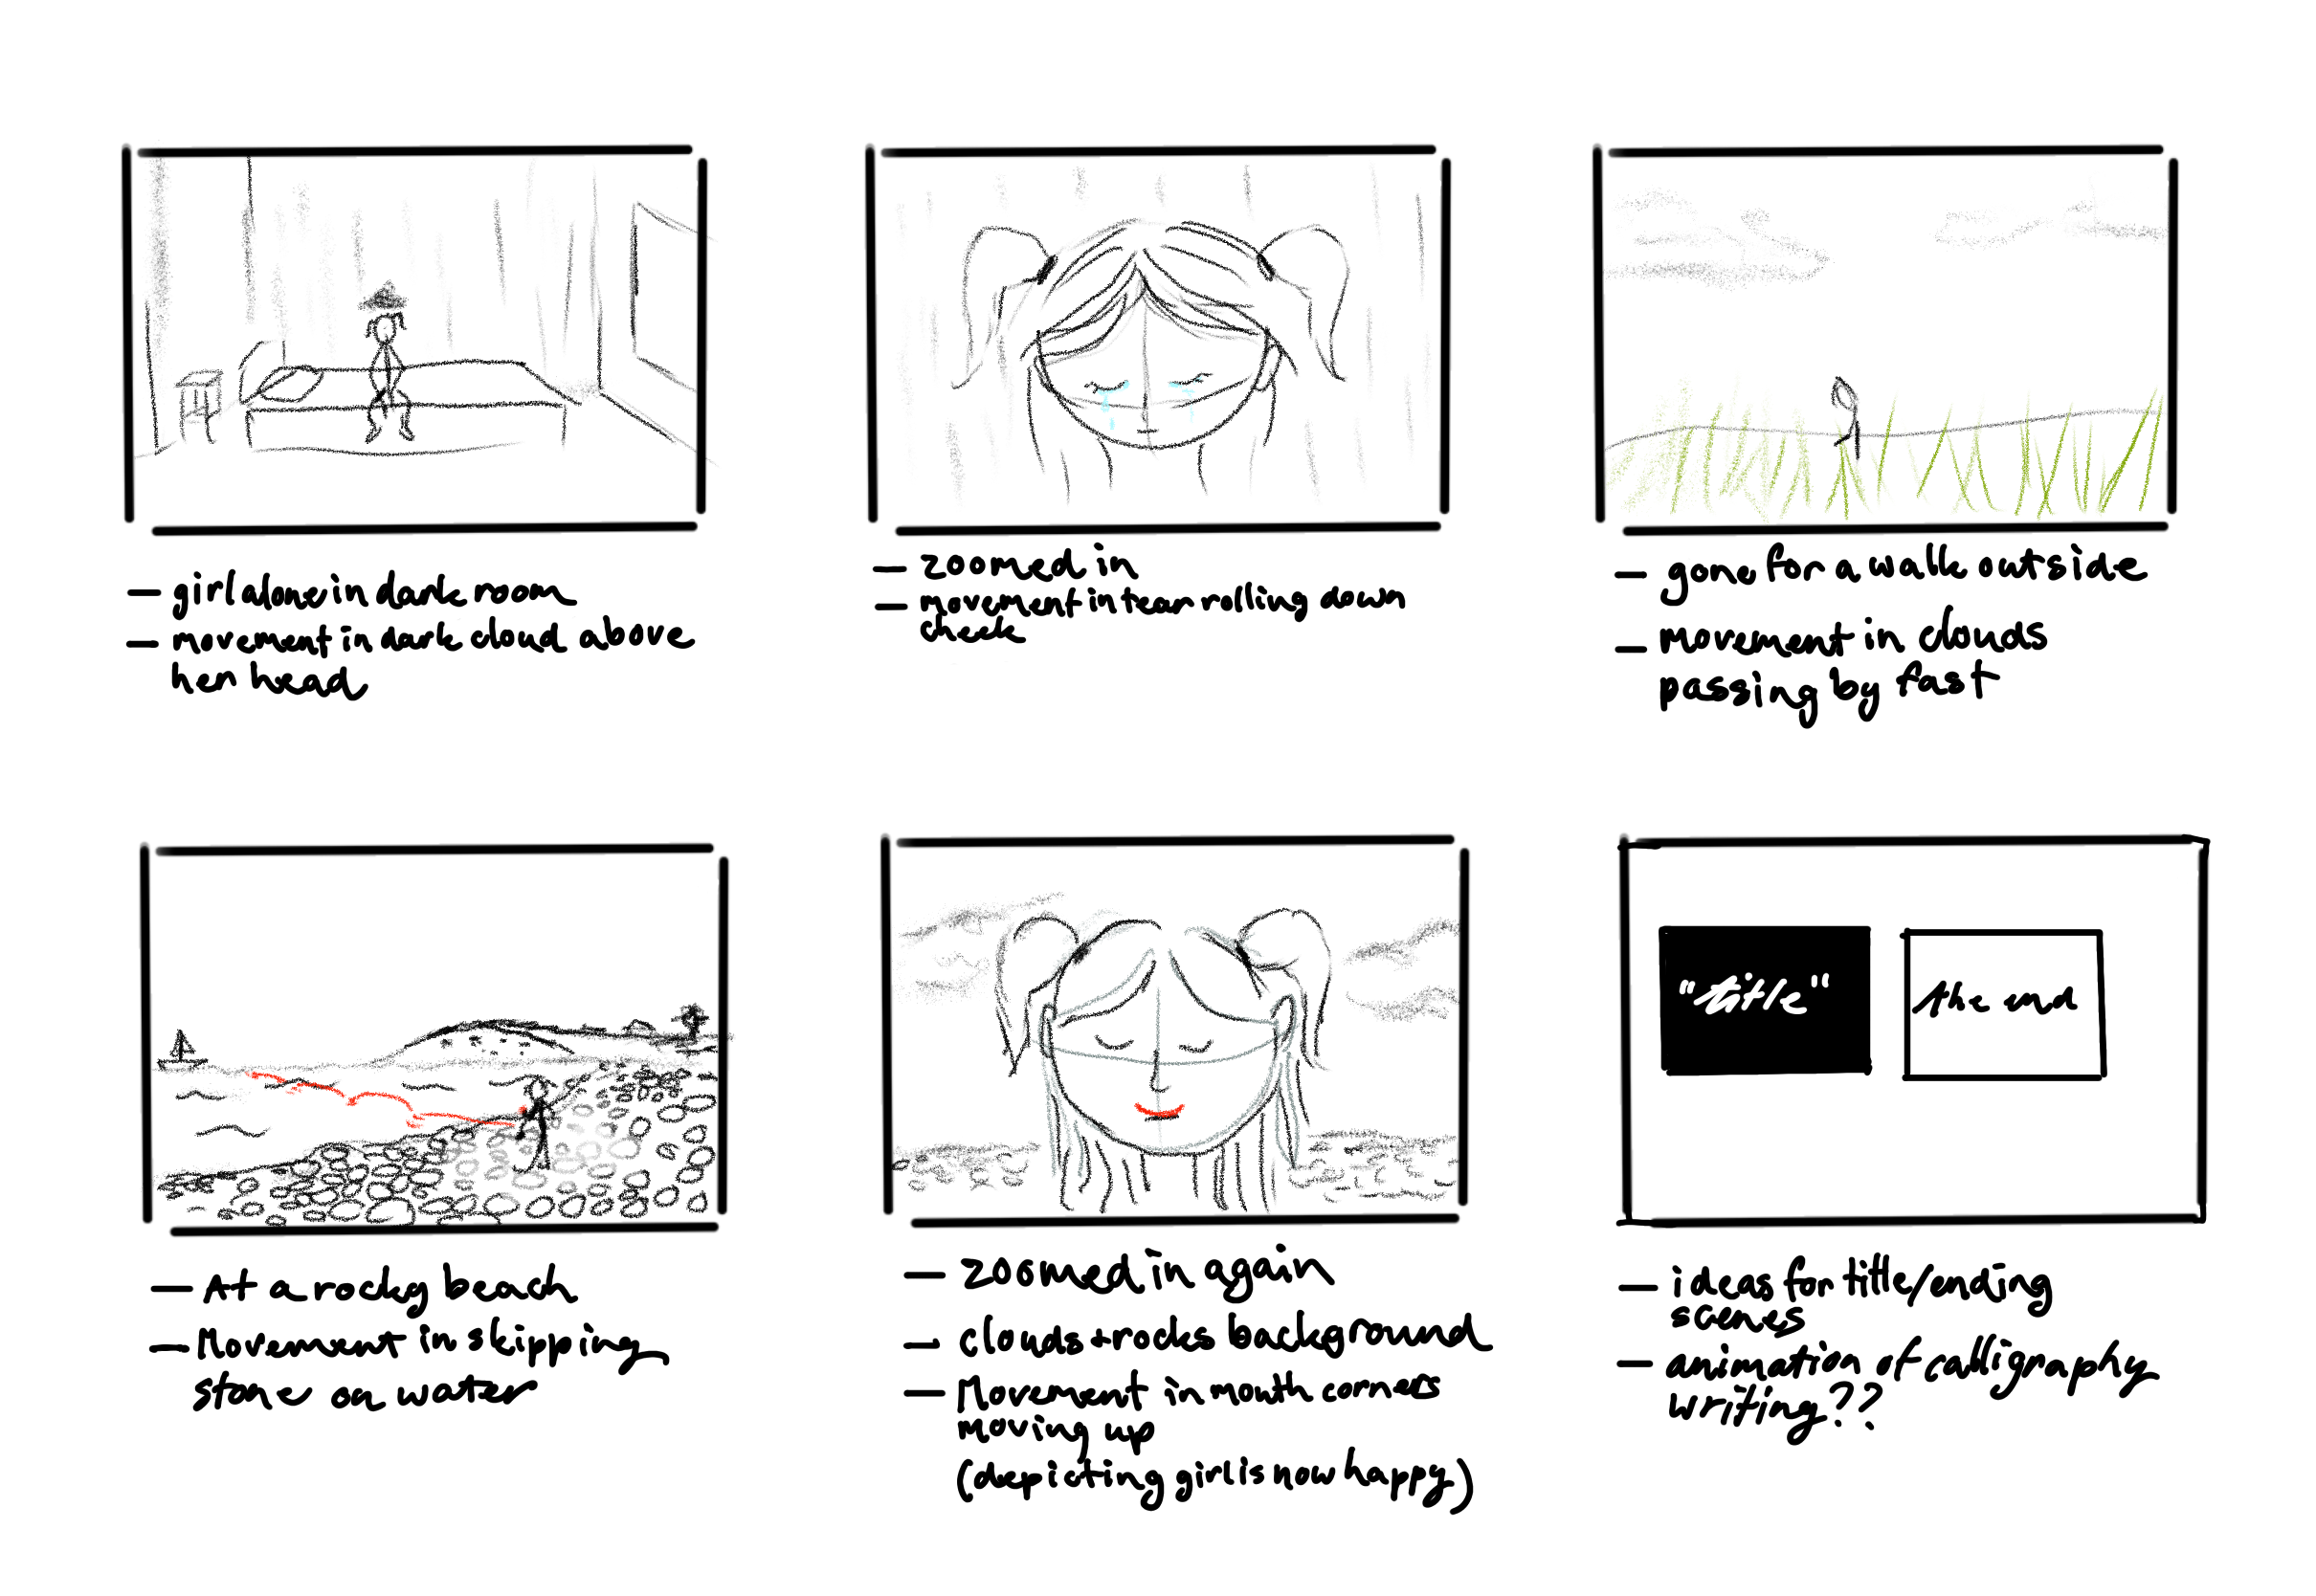
Storyboard Development
As the goal of my animation is to tell a simple story through a few keyframes with small animated
elements, the next step was to create a storyboard sketch.
Story of the Animation
The idea behind the story I want to tell with my animation is about feeling sad or alone. Yeah, I
know,
that sounds super generic. But hear me out (or, well, let me ramble a bit).
I’ve been through a lot in my life, from when I was really little up to now. It’s something that
sticks
with me, and while I don’t want to go into all the details, I do want to express a small part of
that
experience in my animation. A simplified version, focused on loneliness and one of the small things
that
helps me feel better in those moments.
For me, that thing is skipping rocks.
When I lived in Northern Ireland, there were times when I would just lie in bed feeling down, not
really
doing anything. But eventually, I’d get up and head outside, mostly just to get out of my own head.
One
of the places I’d always go to was this little island on Strangford Lough. I’d walk through the
fields
and onto the island, where there was a rocky beach filled with stones.
I used to look for the perfect small, flat, round rocks, the best kind for skipping. I wasn’t always
great at it, but when I got a few good bounces across the water, I felt pure joy. It was this small,
peaceful thing that made me feel calm, happy, and grounded. I could spend hours there, skipping
stones,
wading through the water in my boots, or just sitting and watching the waves.
This moment, that feeling of quiet comfort in nature, is what I want to turn into a short animation.
Something simple, but emotional. A scene that shows a character feeling down, finding their way to a
quiet place, and slowly reconnecting with something that brings them peace.
That’s the core of my story. Not big or dramatic, just something small and real.
User Feedback Storyboard
After sketching my storyboard, I wanted to get some user feedback to gain insight into how people
interpreted the story and to receive general suggestions on the project.
I first sent the storyboard to one person directly, but then decided it would be more efficient to
create a short Microsoft Forms survey and share it with multiple people.
I included a short explanation of what I’m aiming to do for this project, a short animation that
tells a personal story with a few key animated elements.
The survey contained three main questions:
What thoughts come to mind when looking at this storyboard?
Based on the storyboard, are you interested in what the story has to say?
Any general advice for the storyboard or project?
Link to summary of results or click the tabs here to see individual responses
(including one from a user I contacted via Discord).
Clean storyboard! Nice use of selective colour to focus attention to the different elements of
the
shots. Nice variation in shots too for how short it is, with closeups, a wide shot and extreme
wide
shots. You're using the rule of thirds on the horizontal axis well! With the closeups the eyes
don't
line up with the top line, but that could be a stylistic choice ofc. You are using the vertical
midline well.
Especially in the extreme wide shots you have a solid amount of negative space, that, especially
in
the beach scene you're filling, making sure it's interesting to look at, and from the storyboard
it
seems you're making sure it doesn't distract from the positive space in your shot. Good shot
composition!!
The first scene also works pretty well as an establishing shot,
Perhaps you could add camera movement notes? Like I can see the first scene be a push shot,
whereas
the walk in the third shot/scene could be a pull, to sell the vastness of the fields? But
currently
there is no camera movement notes, even though the camera movement is a really powerful tool in
storytelling!! If the camera moves, it sells the shot a lot more, and can really add. A still
camera
can sometimes detract from the film/video. Like static shots aren't a bad thing, but you
probably
want some variation. The closeups are ideal for statics, the walk could even be a motion shot
with
static camera tbh.
I'm also assuming the foreground moves for parallax in the walking shot, perhaps you could
indicate
that too?
The beach shot is really nice.
The storytelling is simple, but effective. Very visual storytelling. No spoken dialogue, right?
Definitely more of an open story, a little loose, more artistic. No clear conflict and
resolution,
like you'd traditionally see, but very clear what's being told. It feels like a music video, or
perhaps an artistic vent art animation.
I think perhaps the hard cut between the closeup shot and the field walk shot could feel a
little
harsh? But that could also work well as a stylistic choice if that's your intent. If you wanted
to
smooth the transition a transition shot could perhaps be helpful? Like an extreme closeup shot
of a
hand on a doorknob, could be a very brief shot, like 1 second or less, depending on the flow
during
editing, but it could serve as a slight ease. A cut to black could also work well, they're nice
and
dramatoc too. Fade to black also works. Doesn't have to be a transition scene, could just be a
transition effect between scenes.
Very nice storyboard!! Great job!!
One suggestion I have btw, think of the sound design in
advance!!
Audio is very powerful and can truly make or break any video. Add some subtle wind in the
outside shots, you could perhaps even
fade in the environmental audio like birds chirping and water sfx as the main character's mood
clears, from a dramatic silence to audio or smth idk.
Anyway just some of my thoughts :3
Not super experienced with storyboards, I have the unfortunate habit of not really using them a
lot
lol.
Do with it what you want!
With it being venting, you might want to look into some nice juicy emotional music,
perhaps record smth yourself on the piano? Because of how focussed it is on emotion,
beyond SFX and sound design, music can also be a very powerful tool!!
I have been following the animation industry and a bunch of indie animators for a decade now so
that's where my storyboard knowledge comes from mainly. I also know a bit about live action
storyboards from my contacts/being involved a little in the dutch film production world.
What thoughts come to mind when looking at this storyboard?
"nature heals, feels like a memory. Simplistic, but
introspective"
Just from the storyboard, are you interested in what it has to say?
Clarify why you are or if
you're not.
"Yeah! It does it's job of making me want to know more of what the specific meaning is."
Do you have any advice for my storyboard or project in general?
"Well, the text is a bit hard to read honestly(though that might be partially because of photo
quality.) If this was a collaborative project, I'd recommend writing bigger (maybe it'd need a
bigger canvas size then). Though, as this is a personal project, it should be fine. As far as
storyboarding goes, as far as I can see, it seems you have every scene played out, that I can
visualize what is going to happen, which is the entire point."
What thoughts come to mind when looking at this storyboard?
"Looks like an interesting storyline of a girl exploring the dreamscape
world by everytime she
closes her eyes and imagines a place she gets sent to it"
Just from the storyboard, are you interested in what it has to say?
Clarify why you are or if
you're not.
"Looks really interesting because personally I've always liked this type of theme and story.
Really the mysterious feeling the storyboard has given me so
far, really looking forward to it"
Do you have any advice for my storyboard or project in general?
"For the storyboard not really since I really like the idea of it (if what I said is even the
idea). As well as the project try to not procrastinate too much
since animation takes a long
time"
What thoughts come to mind when looking at this storyboard?
"This story is clearly very personal. Asking for feedback on something you're passionate about
telling can be very scary so I'm already very proud of you! For your next step, I'd try working
with rough colors for these scenes, focusing on the contrast between the dark and light moments.
You've clearly put a lot of thought into this and you can trust yourself on that."
Just from the storyboard, are you interested in what it has to say?
Clarify why you are or if
you're not.
"The story is one that many can relate to. That alone is gripping, but by keeping it simple you
reach an even bigger audience. I think it is also very comforting to end on a happy note."
Do you have any advice for my storyboard or project in general?
"TRUST IN YOURSELF!!!!! You've got this, it is super awesome that you're doing this. I hope
you're doing well."
I got a lot of feedback and insight from this round of user testing. User 1 gave really useful and
detailed input. I hadn’t even put it into words myself yet, but they described it as “artistic vent
art animation”, and now that I think about it, that’s exactly what it is. So I’m really glad that
came across clearly, even just through the storyboard.
This user also gave a lot of advice regarding the final edit. I’ll definitely keep this in mind,
especially when it comes to making sure the cuts between scenes aren’t too harsh. They also
mentioned sound design. While that’s not technically in the scope of this project, it is an amazing
idea, and as a musician, I love it. If I end up having the time, I’d love to add some sort of
soundscape or even my own piano playing to support the emotion in the piece.
User 2 gave shorter answers, but still some really nice insights. They said it felt like a memory
and mentioned that “nature heals,” which is exactly one of the feelings I wanted to portray. It
feels good to know that the story I’m trying to tell is resonating, and that people even want to
know more of the “lore” behind the simple visuals. This user also pointed out that the text was a
bit hard to read, probably due to Microsoft Forms’ compression quality. They did say the storyboard
itself was clear and that all scenes felt planned out, which is of course the goal.
User 3 had a slightly different take than what I expected. They interpreted the storyboard as
someone going through a dreamscape, where each time you close your eyes, you're somewhere else.
That’s not what I originally had in mind, but it’s such an interesting idea, and honestly, it still
fits. Even if I wasn’t physically in those places, imagining them could still bring me comfort. This
dream-like concept is something I definitely want to keep in mind for future projects.
Lastly, User 4, a friend of mine who studies ‘mediavormgeving’ at Sint Lucas, recognised that this
story is really personal. She said it was brave to ask for feedback on something that close to me,
and she appreciated the way I made it relatable through simplicity. Her main advice was to start
thinking about colour next, especially the contrasts between dark and light moments. She also
reminded me to trust in myself and encouraged me to keep going with this project, which meant a lot.
First Sketches
This was the first sketch of the animation, where I worked on the first keyframe and started experimenting
with making the surroundings more dynamic. I added a cloud above the head at the end, which I’ve decided I
should include throughout the whole scene to keep the mood consistent. To practice animating the stone
skipping across the water, I also created a simple test scene, something I can reuse or build upon in the
later stages of the project.
Animation Test Keyframe 1Skipping Stone Animation Test
The image on the left shows the art for the first keyframe. I liked the idea from the test animation, but I
wanted to bring in a bit more colour, so I made the pillow and blanket purple. I also started working on the
second keyframe, which includes a tear rolling down the cheek. To add some subtle movement, I redrew the
hair in each frame so it feels a bit more dynamic alongside the tear. The tear animation still needs some
adjustments, but this is a solid starting point.
Digital Art for First KeyframeAnimation Test Keyframe 2
As I mentioned in the research section, when I was little, I used to animate names using my Nintendo DS and
Flipnote Studio. I also sketched out in my storyboard the idea of creating an intro title and a credit
scene, starting with a dark background and ending with a lighter one to reflect the emotional shift in the
story. That’s why I decided to animate my name in a calligraphy style using Procreate. Compared to my old DS
animations, this version is much smoother—but it also took a lot longer. The final result is 255
individually drawn frames (yes, I drew every single one), which helped make the animation more
dynamic—similar to how I animated the hair in the second keyframe. It maybe took around 8 hours, but to be
fair, it was fun, and I even made a pink version for my website.
My Name Animated for Title
Feedback & Next Phase
I continued working on my project and made a few adjustments based on feedback from my teacher, who
mentioned that the speed of my title animation could be increased a bit. Originally, it was set at 20fps,
but I’ve now updated it to 30fps for a smoother result. I’ve also included the pink version, which is
featured on the homepage of my website (this was a suggestion from a user I showed my animation).
My Name Animated for Title (30fps version)Pink Version 30fps
For keyframe 1, I added a black cloud above the head, which I once again drew frame by frame to give it
subtle movement. I also introduced a dark cloud surrounding the scene that slowly closes in as it
progresses, this is meant to visually portray feelings of despair. User
feedback: I
asked what emotion this evokes, and the response I received was that it accurately represents the feeling of
a panic attack. For keyframe 2, I made the tear slightly narrower. I actually used footage of myself crying
to create a more accurate, rotoscoped tear. I haven’t implemented this new
version yet, and the actual animation of the tear falling still needs to be added, but the main concept of
the scene has been sketched out.
Updated Version Keyframe 1Updated Version Keyframe 2
I started working on keyframe 3. I reused the background from the skipping stone test animation and added
some grass, along with the stickman girl. Like in the previous keyframes, I kept her white, but since the
contrast is a bit low in this scene, I’ll likely darken the background in that area with a slightly deeper
blue. I still need to begin animating, I plan to animate the clouds at the very least, and if time allows,
I might add some additional background elements like trees.
For keyframe 4, where the character skips the stone, I built upon the test animation by adding more visual
details.
The scene now includes hills in the background and a stone beach, where I’ve drawn a few extra lines to
suggest texture and rocks.
I also added the main character (still in stickman style with ponytails) and included some small stones in
her hands to prepare for the skipping motion.
Digital Art for First KeyframeDetailed Version keyframe 4
Final Stage: Editing
While I haven't finished animating every keyframe yet, I'm confident the remaining animations won't take too
long, especially since I can reuse some frames and make small adjustments. Once a main scene is set up,
animating smaller elements usually takes me about an hour.
That's why I've decided to already begin stitching together the keyframes I've completed so far.
Since I've been working in Procreate, I chose to use iMovie for this initial edit. For larger or more
complex projects in the future, I'd definitely consider switching to a more professional tool within the
Adobe Creative Cloud.
But for this project, with the time I have, iMovie on my iPad is efficient, simple to use, and more than
enough to get the job done.
In the video below, you'll find the first draft. It's still a work in progress and doesn't yet include all
the keyframes.
First Draft Project X
Personal Reflection
During this project, I learned a lot and made improvements across all of my learning outcomes.
While I didn't have as much time as I would've liked to make the animation even more detailed, I really
enjoyed
the project and the whole process, from doing research to storyboarding to creating the final piece.
Doing something I'm passionate about really helped me enjoy the work more, and it also made it easier to ask
for
feedback, since I actually cared about the result.
I genuinely loved working on this and definitely want to continue doing animation. Whether it's for personal
projects or school assignments, this project made me realise that animation is something I truly enjoy and
want
to get better at.
There are a few things I'm not entirely happy with that I want to reflect on. First of all, we only ended up
having two weeks for this project. Because of personal struggles and issues with planning, and still having
a
lot to finish for my portfolio, I didn't have any extra time beforehand to really think through my idea or
plan
it out properly. I also didn't reach out for a project coach until the last minute.
Speaking of which, after I got assigned a coach, I only had one meeting with them. This was partly due to my
own
difficulties with asking for feedback, something I'm actively working on improving with help from Student+
(more
on this under LO5).
I'm not proud of how that part went, but I still managed to accomplish quite a bit. I asked feedback from
other
teachers twice during the project and tested both my storyboard and keyframe drafts with users more
regularly.
All in all, the process of doing research and asking for feedback went much better than in previous
projects,
and I feel like I've made some significant progress.
Now that I think about it, the fact that this was a passion project probably helped a lot with that. So a
good
takeaway for the future is that even if I'm not particularly interested in a project, I should try to find
ways
to make it fun for myself by including my own passions where possible.
Lastly, I want to talk about the final product and the deadline. The final portfolio deadline comes before
our
last project presentation, which means I've done my best to get all the keyframes done and edited into the
final
video, but the presentation process itself isn't included on the portfolio page.
This is partially due to my planning issues, but I also think it would've made more sense to have the
project
presentation before the portfolio deadline — that way I could've included everything in one go.
All in all, despite the chaos of the last two weeks and still having areas to improve (like adding more
detail
to the animation), I learned a lot and I'm happy with what I've achieved.
I had a few clear success criteria: create a completed 5-second animation using traditional techniques
(which
I've done a few times now), collect and apply feedback on my storyboard, ask for more feedback during the
process, and be able to explain the tools and techniques I've used — like Procreate, iMovie, onion skinning,
rotoscoping, and storyboarding.